A handy guide to unpicking
- Emma Cartmel

- Nov 3, 2024
- 4 min read
Updated: Nov 23, 2024
Unpicking stitches is an inevitable part of sewing. Sure it's not fun, but knowing how to do it correctly can save you time and protect your fabric.
Unpicking stitches is an inevitable part of sewing. Sure, it’s not the most fun, but knowing how to do it correctly can save you time and protect your fabric.
Unpicking stitches is especially common if you love techniques like gathering or if you have a perfectionist streak, like me, that demands nothing less than perfectly aligned seams. As frustrating as it may feel to backtrack, unpicking doesn’t have to be a dreaded chore. Understanding the right techniques can make a big difference, streamlining your sewing process and protecting your fabric from accidental snags or tears.
With a few handy tips and a bit of know-how, you’ll be able to fix common sewing mishaps. In this post, I’ll focus on two of the most common types of stitching: straight and overlocking.
Wrap-up of this article
Unpicking overlocked seams
Recommended equipment
Quick unpick (also known as a seam ripper): For cutting the stitches.
Thread snips: Snips or small embroidery scissors are ideal, but standard sewing scissors work well also.
Tweezers: Optional, but can be useful when removing stray threads after unpicking.
Sticky tape: Also optional, but can be a quick method of picking up loose threads.

Anatomy of a quick unpick
Point: Slides under the stitches to make cutting easier.
Ball tipped point: Helps protect your fabric from damage.
Blade: Cuts through the stitches (replace your quick unpick if the blade ever gets dull).
Handle: Provides grip and control.

Unpicking straight stitching
Method 1: Closed Seam
Place the fabric right side up so you can see the needle thread stitches (not the bobbin thread).
Insert the point of the quick unpick through a looped stitch.
Use the blade of the quick unpick to carefully cut through the stitch.
Repeat this along the seam, cutting every 3rd or 4th stitch—this is usually enough..
Turn the fabric over to reveal the bobbin thread.
Gently pull the bobbin thread from one end. It should come away quite easily, loosening the needle threads in the process.
Tidy the seam by picking up any stray or leftover threads. This is when sticky tape or tweezers can come in handy at this point.
Tip: Avoid pulling on a single thread, as this can damage the fabric, especially if you used a tighter stitch length. Pulling works better with larger stitches, such as those used when gathering or basting.
Method 2: Open Seam
Place the fabric right side up so you can see the needle thread stitches (not the bobbin thread).
Insert the point of the quick unpick through a looped stitch.
Use the blade of the quick unpick to carefully cut through the stitch.
Repeat this along the seam, cutting another 2-3 stitches.
Turn the fabric to the wrong side, revealing the opening in the seam.
Insert the ball end of the quick unpick into the opening.
Carefully slide the quick unpick along the seam to cut the stitches in one motion. Take your time, being careful not to cut the fabric. Alternatively, use your scissors to make small cuts along the seam.
Tidy the seam by picking up any star or leftover threads. This is when sticky tape or tweezers can come in handy.
Tip: If you've sewn in the wrong place, consider re-stitching the correct seam before unpicking. This will help hold the fabric layers in place while you unpick the correct stitching.
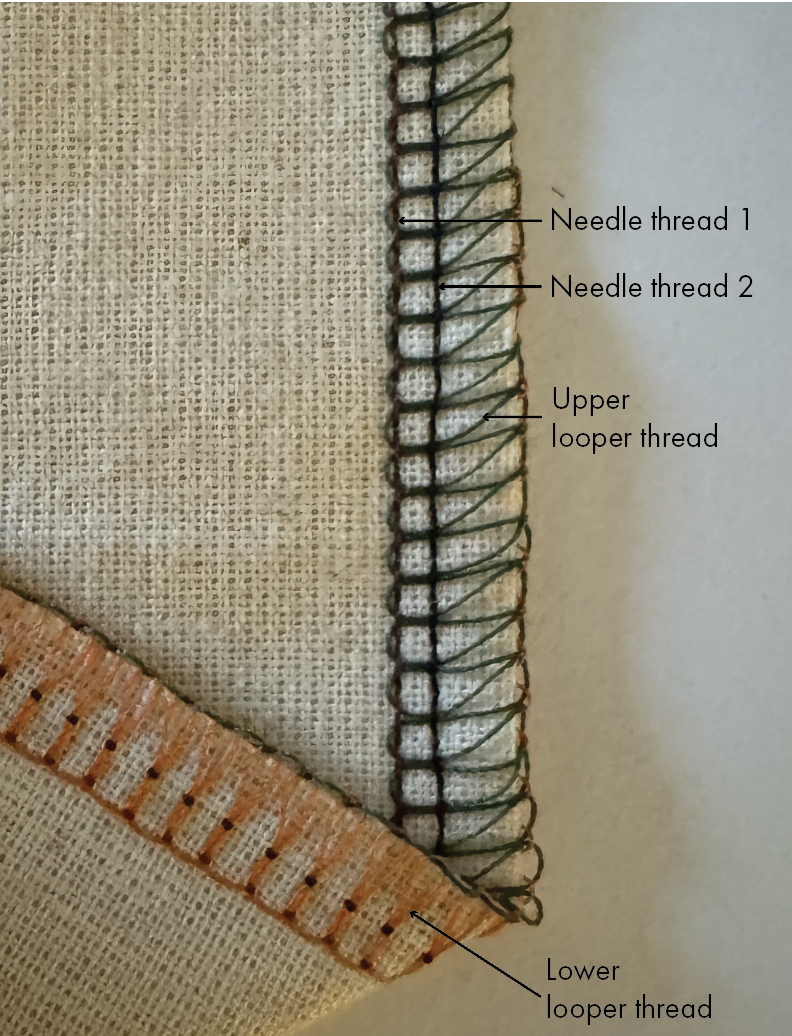
Unpicking overlocked seams (4 thread overlocker)

A four-thread overlock consists of:
Two needle threads (dark red and blue).
One upper looper thread (green).
One lower looper thread (orange).
Unpicking overlocked seams can be trickier due to the multiple threads, but here’s a simple step-by-step approach:
Place the fabric right side up so you can see the two vertical needle threads.
Insert the point of the quick unpick through the loops of the two needle stitches.
Use the blade of the quick unpick to carefully cut through the stitch.
Repeat this along the seam, cutting every 3rd or 4th stitch—this is usually enough.
Turn the fabric over to reveal the bobbin thread.
Gently pull the lower looper thread. It should come away quite easily, loosening the needle threads, and upper looper thread in the process.
Tidy the seam by picking up any stray or leftover threads. This is when sticky tape or tweezers can come in handy.
Unpicking overlocked seams (3 thread overlocker)
Its been a while since I have used, or had access to a three thread overlocker. However the process is much the same as that of a 4 thread. The only difference is that there is only one needle thread, so unpicking becomes even easier. Simply follow the instructions for a 4 thread overlocker, but in step 2, you will only be cutting 1 needle thread.
I hope these unpicking techniques make your sewing life a bit easier. Feel free to get in touch or leave a comment to share your experience. I’d love to hear from you!
Thanks for reading.
Emma xx
This is a personal blog. Any views or opinions contained on this site are my own. I am not affiliated with any brands, products, or organisations mentioned, and do not receive any sponsorship, payment, or other compensation for any of the content on this site.


Comments